前言 前面我们讲了状态管理V1相关装饰器和注意事项,一般来讲是足够在开发中使用了,但还是有一些不方便的地方,因此又有了状态管理 V2。
综述 V2 版本的状态管理装饰器有以下几种,都是从api12开始支持。不过问题不大,目前应用市场上架鸿蒙应用最低版本要求就是api12
@ComponentV2装饰器:自定义组件
@ObservedV2装饰器和@Trace装饰器
@Local装饰器:组件内部状态
@Param:组件外部输入
@Once:初始化同步一次
@Event装饰器:规范组件输出
@Provider装饰器和@Consumer装饰器:跨组件层级双向同步
@Monitor装饰器:状态变量修改监听
@Computed装饰器:计算属性
@ComponentV2 和V1中的@Component装饰器一样,@ComponentV2装饰器用于装饰自定义组件:只有在该装饰器修饰的类中才能使用,也仅能使用其他V2版本的状态管理装饰器,无法在同一个自定义组件中混用V1、V2装饰器
1
2
3
4
5
@ComponentV2 Index { build (
@ObservedV2和@Trace 先来看下这两个,后续介绍其他装饰器时有用到。@Observed和@ObjectLink来实现,但有一个问题就是无法进行嵌套观测,只能观测当前层级的属性变化。V2 版本的这两个装饰器配合使用,可以实现跨嵌套层级观测。
1
2
3
4
5
6
7
8
9
10
11
12
@ObservedV2 class Person {@Trace name : string = '' @Trace age : number = 0 @Trace address :Address = new Address ()@ObservedV2 class Address {@Trace zipCode : string = '000000' @Trace city :string = '北京'
定义一个嵌套类,使用@ObservedV2装饰需要观测的类,并且在类中使用@Trace修饰每一个需要参与UI绘制的属性。当需要观测的类和属性较多时,写起来就比较恶心了。
@Local 该装饰器修饰的变量只能 在本地初始化,不能由外部传入,目的是能更好的表示组件内部的状态,不会被外部传入参数影响。@State相比,它无法观察到class对象属性的赋值,仅能观察到对象的整体赋值,也就是说它的观测能力仅限于被装饰变量的本身。@ObservedV2和@Trace装饰器。UIUtils.getTarget()获取原始对象进行比较。
1
2
3
4
5
6
7
8
9
10
11
12
13
14
15
16
17
18
19
20
21
22
23
24
25
list : string [][] = [['a' ], ['b' ], ['c' ]];@Local strList : string [] = this .list [0 ];@Monitor ("strList" )onStrChange (monitor: IMonitor ) {error (0x01 , '@Local' , 'strList has changed' )build (Column () {Button ('修改为同一个对象' ).onClick (() => {if (this .strList !== this .list [0 ]) {error (0x01 , '@Local' , '重新赋值' )this .strList = this .list [0 ];Button ('修改为同一个对象' ).onClick (() => {if (UIUtils .getTarget (this .strList ) !== this .list [0 ]) {error (0x01 , '@Local' , '重新赋值' )this .strList = this .list [0 ];
这里我们定义了一个二维数组,同时将数组第一项赋值给被@Local修饰的变量,同时使用@Monitor观察该变量的变化。重新赋值和strList has changed。当我们点击第二个按钮时,控制台没有打印。
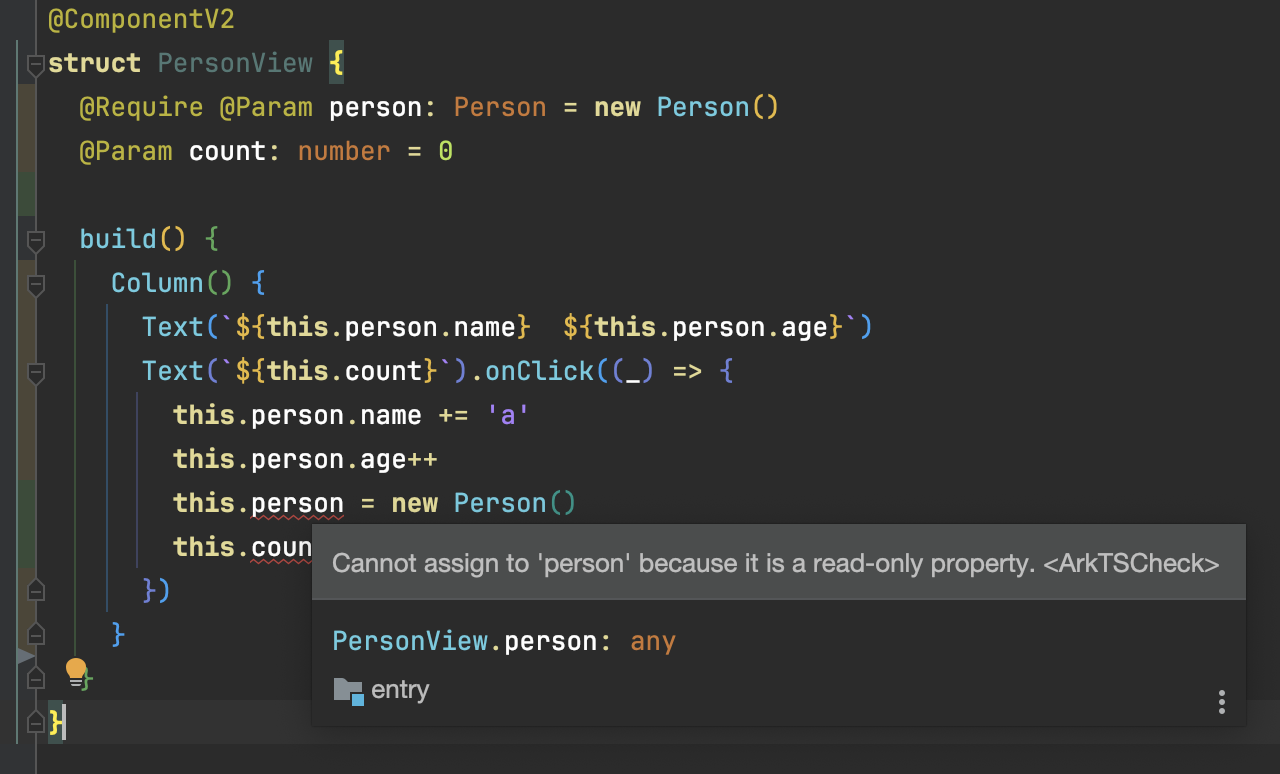
@Param 可以从父组件传入,也可以在本地初始化,如果配合@Require使用,则父组件必须传入该参数,此时本地初始化的值将被覆盖。没有 被@Trace修饰,修改类对象属性也不会引起 UI 刷新Cannot assign to 'count' because it is a read-only property.
@Once 如果想要直接在组件内修改被@Param修饰的变量本身,可以配合@Once,但是,但是,但是,被@Once装饰的变量仅能在外部初始化一次,当在外部修改该变量本身时,不会同步到子组件。看下示例:
1
2
3
4
5
6
7
8
9
10
11
12
@ObservedV2 class Person {@Trace name : string = '' @Trace age : number = 0 @Trace address :Address = new Address ()@ObservedV2 class Address {@Trace zipCode : string = '000000' @Trace city :string = '北京'
两个数据类都被@ObservedV2修饰,属性都被@Trace修饰,方便我们观察数据变化。
1
2
3
4
5
6
7
8
9
10
11
12
13
14
15
16
17
18
19
20
21
22
23
24
25
26
27
28
29
30
31
32
33
34
35
@ComponentV2 PersonView {@Require @Param person : Person = new Person ()@Param count : number = 0 build (Column () {Text ('子组件内容,未被@Once 修饰' )Text (`${this .person.name} ${this .person.age} ` )Text (`${this .count} ` ).onClick ((_ ) => {this .person .name += 'a' this .person .age ++Text (`${this .person.address.zipCode} ${this .person.address.city} ` )@ComponentV2 PersonView2 {@Require @Param @Once person : Person = new Person ()@Once @Param count : number = 0 build (Column () {Text ('子组件内容,被@Once 修饰' )Text (`${this .person.name} ${this .person.age} ` )Text (`${this .count} ` ).onClick ((_ ) => {this .person .name += 'a' this .person .age ++Text (`${this .person.address.zipCode} ${this .person.address.city} ` )
两个自定义组件,其中 PersonView2内部的变量都是用@Once修饰。
1
2
3
4
5
6
7
8
9
10
11
12
13
14
15
16
17
18
19
20
21
22
23
24
25
26
27
28
29
30
@Local person : Person = new Person ()build (Column () {Text ('父组件内容' )Text (`${this .person.name} ${this .person.age} ` )Text (`${this .count} ` )Text (`${this .person.address.zipCode} ${this .person.address.city} ` )PersonView ({ person : this .person , count : this .count }).margin (10 ).backgroundColor ("#66ace4" )PersonView2 ({ person : this .person , count : this .count }).margin (10 ).backgroundColor ("#66ace4" )Flex ({ wrap : FlexWrap .Wrap , space : { main : LengthMetrics .vp (5 ), cross : LengthMetrics .vp (5 ) } }) {Button ('修改Person属性' ).onClick ((_ ) => {this .person .age += 3 this .person .name += 'c' Button ('修改Count' ).onClick ((_ ) => {this .count += 7 Button ('修改 address属性' ).onClick ((_ ) => {this .person .address .zipCode += '9' this .person .address .city += 'w' Button ('对Person重新赋值' ).onClick ((_ ) => {this .person = new Person ()this .person .name = 'new person' this .person .age = 22 margin (10 ).backgroundColor ("#55ff6134" )
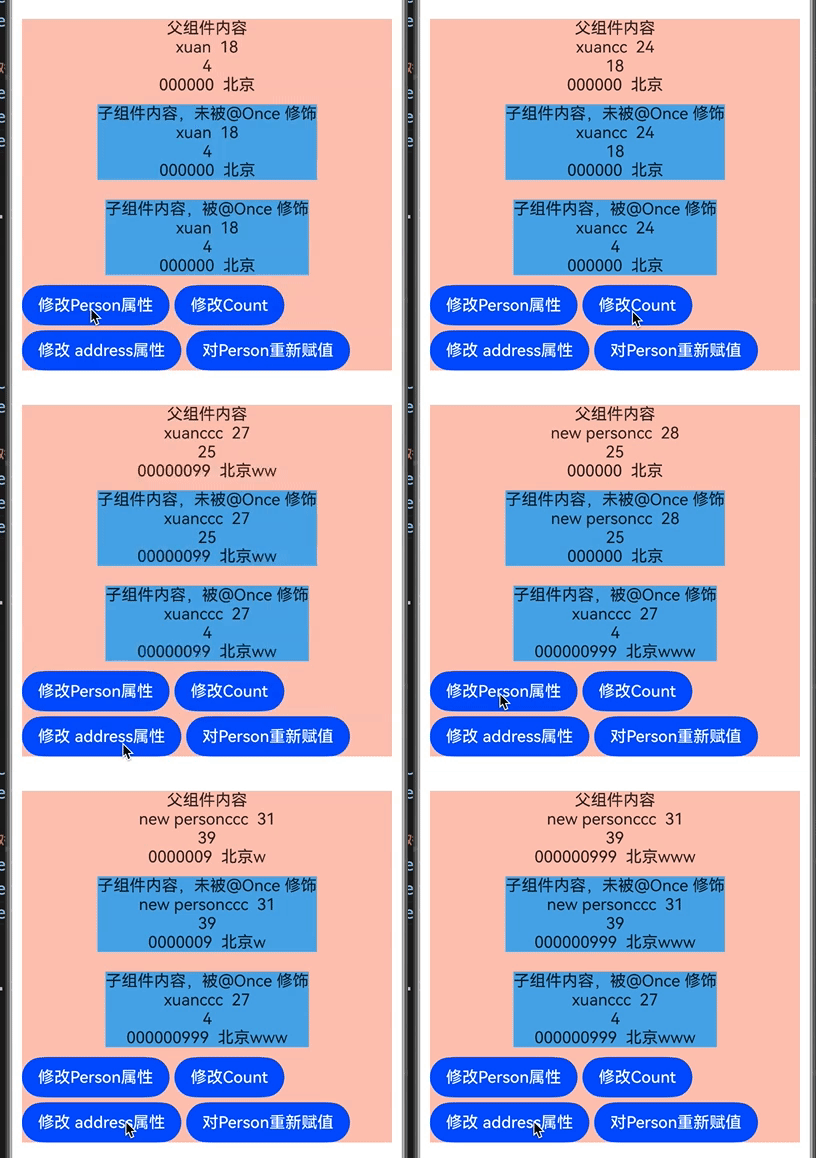
我们在父组件和两个子组件中传入了同一个person对象和count,然后用四个按钮来修改person对象的属性、修改person本身来做一个直观的展示
修改Person属性按钮时,父组件、两个子组件都可以刷新 UI,而点击修改Count和对Person重新赋值时,只有父组件和PersonView刷新了UI,可以看到@Once是拦截了数据源的变化,不影响@Param的观察能力。并且拦截的是数据源的赋值操作,修改其属性并不会被拦截。
还有一点就是,当我们点击对Person重新赋值后,再点击修改Person属性,发现只有父组件和PersonView刷新了UI,因为这时在父组件和PersonView中已经是新的对象了,而PersonView2中还是之前的对象,同步被打断,无法进行更新。
@Event 上面说了这么多,但就是想做到像 V1中的数据双向同步怎么办?毕竟这是一个挺常见的需求。@Event装饰器装饰回调方法并调用,可以实现更改数据源的变量,再通过@Local的同步机制,将修改同步回@Param,以此达到主动更新@Param装饰变量的效果。规范组件输出:
@Param标志着组件的输入,表明该变量受父组件影响,而@Event标志着组件的输出,可以通过该方法影响父组件。使用@Event装饰回调方法是一种规范,表明该回调作为自定义组件的输出。父组件需要判断是否提供对应方法用于子组件更改@Param变量的数据源。
直接看示例
1
2
3
4
5
6
7
8
9
10
11
12
13
14
15
16
17
18
19
20
21
22
23
24
25
@ComponentV2 ShowEventAnno {@Event changeFontColor : () => void @Event changeFontSize : (size: number ) => void @Require @Param fontColor : string @Require @Param fontSize : number build (Column (){Text ('ShowEventAnno View' ).fontColor (this .fontColor ).fontSize (this .fontSize )Row (){Button ('修改文字大小' ).onClick ((_ )=> {if (this .changeFontSize ){this .changeFontSize (this .fontSize +2 )Button ('修改文字颜色' ).onClick ((_ )=> {if (this .changeFontColor ){this .changeFontColor ()
使用@Event装饰箭头函数,这个函数的参数、返回值类型没有要求。当我们需要修改@Param修饰的变量时,比如在点击事件中,可以调用传入的@Event 修饰的函数,通知父控件对数据进行修改。
1
2
3
4
5
6
7
8
9
10
11
12
13
14
15
16
17
18
@Local fontColor : string = '#ff6134' @Local fontSize : number = 14 build (ShowEventAnno ({fontColor : this .fontColor ,fontSize : this .fontSize ,changeFontColor : () => {if (this .fontColor == '#ff6134' ) {this .fontColor = '#39d167' else {this .fontColor = '#ff6134' changeFontSize : (size: number ) => {this .fontSize = size
值得注意的是,使用@Event修改父组件的值是立刻生效的,但从父组件将变化同步回子组件的过程是异步的,即在调用完@Event的方法后,子组件内的值不会立刻变化。这是因为@Event将子组件值实际的变化能力交由父组件处理,在父组件实际决定如何处理后,将最终值在渲染之前同步回子组件。
@Monitor 可以用来监听状态变量的改变,在V1版本的@Watch中,无法实现对对象、数组中某一单个属性或数组项变化的监听,且无法获取变化之前的值。并且@Monitor既可以用在自定义组件中,也可以用在数据类中,可以同时监听多个对象属性,也可以精确的监听对象的某个属性。
监听的变量需要被@Local、@Param、@Provider、@Consumer、@Computed装饰,未被状态变量装饰器装饰的变量在变化时无法被监听。@Monitor可以同时监听多个状态变量,这些变量名之间用”,”隔开。
监听的状态变量为类对象时,仅能监听对象整体的变化。监听类属性的变化需要类属性被@Trace装饰,未被@Trace装饰的属性的变化无法被监听。
支持对数组中的项进行监听,包括多维数组,对象数组。@Monitor无法监听内置类型(Array、Map、Date、Set)的API调用引起的变化。当@Monitor监听数组整体时,只能观测到数组整体的赋值。可以通过监听数组的长度变化来判断数组是否有插入、删除等变化。当前仅支持使用”.”的方式表达深层属性、数组项的监听。
一个简单的例子:
1
2
3
4
5
6
7
8
9
10
11
12
13
14
15
16
17
18
19
@Local name : string = "xuan" ;@Local age : number = 12 ;@Monitor ("message" , "name" )onStrChange (monitor: IMonitor ) {dirty .forEach ((paramsName: string ) => {error (0x01 , 'MonitorPage' ,`属性名:${paramsName} 由 ${monitor.value(paramsName)?.before} 修改为 ${monitor.value(paramsName)?.now} ` )build (Column () {Text (`name:${this .name} message:${this .age} ` )Button ("修改简单类型变量" )onClick (() => {this .name += "a" ;this .age += 3
当我们点击修改简单类型变量按钮时,会触发@Monitor装饰的方法,但需要注意的是,该方法的参数是IMonitor类型,它有两个属性: dirty: Array<string>和value<T>(path?: string): IMonitorValue<T> | undefined,其中dirty保存发生变化的属性名。而value是一个方法,用于获取指定属性的变化信息,当该方法有返回值时,返回值是IMonitorValue类型,包含before、now和path属性。
我们还可以精确的监听类对象的某个属性,这个监听可以写在类中,也可以写在控件中
1
2
3
4
5
6
7
8
9
10
11
12
13
14
15
16
17
18
19
20
21
22
23
24
25
26
27
28
29
30
@ObservedV2 class Person {@Trace name : string = "Tom" ;@Trace region : string = "North" ;@Trace job : string = "Teacher" ;age : number = 25 ;@Monitor ("name" )onNameChange (monitor: IMonitor ) {error (0x01 , 'MonitorTest' , `name change from ${monitor.value()?.before} to ${monitor.value()?.now} ` );@Monitor ("age" )onAgeChange (monitor: IMonitor ) {error (0x01 , 'MonitorTest' , `age change from ${monitor.value()?.before} to ${monitor.value()?.now} ` );@Monitor ("region" , "job" )onChange (monitor: IMonitor ) {dirty .forEach ((path: string ) => {error (0x01 , 'MonitorTest' ,`${path} change from ${monitor.value(path)?.before} to ${monitor.value(path)?.now} ` );
在控件中
1
2
3
4
5
6
7
8
9
10
11
12
13
14
15
16
17
18
19
20
21
22
23
24
25
26
27
28
29
30
31
32
33
34
@Local monitorTest : Person = new Person ()@Monitor ("monitorTest.name" )onChangeName (monitor: IMonitor ) {error (0x01 , 'MonitorPage' , '在自定义控件中监听对象属性变化:' +`${monitor.value()?.path} 由 ${monitor.value()?.before} 修改为 ${monitor.value()?.now} ` )build (Column () {Text (`name: ${this .monitorTest.name} ,age:${this .monitorTest.age} ,region: ${this .monitorTest.region} , job:${this .monitorTest.job} ` )padding (4 )borderWidth (1 )borderColor ("#887612" )Button ("change name" )onClick (() => {this .monitorTest .name += 'b' ; Button ("change age" )onClick (() => {this .monitorTest .age += 1 ; Button ("change region" )onClick (() => {this .monitorTest .region +='region ' ; Button ("change job" )onClick (() => {this .monitorTest .job +='job ' ;
这个也有一点需要注意,当我们对类对象重新赋值,但是赋值前后类对象的属性值不变,也不会触发@Monitor回调。@Monitor会在状态变量初始化完成之后生效,并在组件销毁时失效。@Monitor会在类创建完成后生效,在类销毁时失效。这个时机晚于类的constructor,早于自定义组件的aboutToAppear。然而由于类的实际销毁释放依赖于垃圾回收机制,因此会出现即使所在自定义组件已经销毁,类却还未及时销毁,导致类中定义的@Monitor仍在监听变化的情况。
@Computed 千呼万唤始出来的装饰器,谁家的状态管理还没有计算属性哇@Computed会检测被计算的属性变化,当被计算的属性变化时,@Computed只会被求解一次。
1
2
3
4
5
6
7
8
9
10
11
12
13
14
15
16
17
18
19
20
21
22
23
24
25
26
27
28
29
30
31
32
33
34
35
36
37
38
39
40
@ObservedV2 class Person {@Trace name :string ='' @Trace age :number = 0 @Computed get info (){error (0x01 ,'ComputedPge' ,"在数据类中获取所有信息" );return `name:${this .name} , age:${this .age} ` @Local name : string = 'xuan' ;@Local age : number = 18 ;@Local address :string ='北京' @Local person :Person = new Person ()@Computed get info () {error (0x01 ,'ComputedPge' ,"获取所有信息" );return `name:${this .name} ,age:${this .age} , address:${this .address} ` build (Column () {Text (`${this .info} ` )Text (`${this .info} ` )Text (`${this .info} ` )Button ('修改简单属性' ).onClick (() => {this .age ++;Text (`${this .person.info} ` )Text (`${this .person.info} ` )Text (`${this .person.info} ` )Button ('修改对象属性' ).onClick (() => {this .person .name +='p'
可以在控制台看到,虽然我们展示多次,但控制台只打印了一次信息;当我们分别点击修改简单属性和修改对象属性时,控制台也是打印一次信息。

