前言 随着鸿蒙Next的推广,做鸿蒙开发的人是越来越多,提问和寻求帮助的人也是越来越多,就我自己回答的问题而言,大部分和状态管理相关,比如List刷新问题,,还有一些录音录像拍照问题。也不是太难的问题,需要特别仔细的阅读官方文档,有些问题的解决方法还分散在好几个文档里面,文档上也没有对一些关键点做特别讲解。这里就最常见的问题总结一下,希望后来的朋友少走一些弯路。
状态管理V1 组件的状态管理一共就这几个:
@State装饰器 初始化 必须 本地初始化。如果从父组件初始化,并且从父组件传入的值非undefined,将会覆盖本地初始化;如果从父组件传入的值为undefined,则初值为@State装饰变量自身的初值。@State修饰的变量都必须要指定初始值,即使被@Require修饰也必须指定初始值。
观察能力 能观察到简单对象的变化;能观察到class 或者 Object 的赋值变化;能观察到其属性赋值的变化,但无法观察嵌套类属性赋值的变化;
1
2
3
4
5
6
7
8
9
10
11
12
13
14
15
16
class OutClass {constructor (outClassName: string ) {this .outClassName = outClassNamethis .innerClass = new InnerClass (`${outClassName} _innerClass` )outClassName : string innerClass : InnerClass class InnerClass {constructor (innerClassName: string ) {this .innerClassName = innerClassNameinnerClassName : string
我们的业务逻辑姑且简化为这样
1
2
3
4
5
6
7
8
9
10
11
12
13
14
15
16
17
18
19
20
21
22
23
24
25
26
27
28
29
30
31
32
33
34
@Component AboutStateAnno {@State count : number = 0 @State grade : string = 'a' @State success : boolean = false @State outClass : OutClass = new OutClass ("out_class" )build (Column () {Text (`count: ${this .count} ` )Text (`grade: ${this .grade} ` )Text (`success: ${this .success} ` )Text (`out_class_name: ${this .outClass.outClassName} ` )Text (`inner_class_name: ${this .outClass.innerClass.innerClassName} ` )Button ('改变简单数据,UI刷新' ).onClick ((_ )=> {this .count ++this .grade += this .grade this .success = !this .success Button ('改变outClassName,UI刷新' ).onClick ((_ )=> {this .outClass .outClassName = 'out_afterChange' Button ('改变innerClassName,UI不刷新' ).onClick ((_ )=> {this .outClass .innerClass .innerClassName = 'inner_afterChange' Button ('改变innerClass,UI刷新' ).onClick ((_ )=> {this .outClass .innerClass = new InnerClass ('new inner_class' )margin (10 ).borderRadius (10 ).backgroundColor (Color .Gray ).padding (10 )
可以看到,改变简单数据后,UI 直接刷新了。修改对象中的属性,UI 也刷新了,但是在改变嵌套类属性时(改变innerClassName,UI不刷新),UI 没有刷新,也就是说改变Object.keys(observedObject)返回的所有属性时,UI都可以刷新。Map来讲:可以观察到Map整体的赋值,同时可通过调用Map的接口set, clear, delete 更新Map的值。Set来讲:可以观察到Set整体的赋值,同时可通过调用Set的接口add, clear, delete 更新Set的值。
小坑 但这里有个比较麻烦的地方:当在build方法内,当@State装饰的变量是Object类型、且通过a.b(this.object)形式调用时,修改对象中的属性后,UI 无法刷新
1
2
3
4
5
6
7
8
9
10
11
12
13
14
15
16
17
18
19
20
21
22
23
24
25
26
27
class Person {age : number = 0 class AddAge {static addAge (person: Person ) {age += 2 class AddAge1 {addAge (person: Person ) {age += 2 addAge1 (person: Person ) {age += 2 addAge (this .person .age += 2 Text (`person.add:${this .person.age} ` ).onClick ((_ ) => {this .person .age += 2 ;
我们来试一下:
1
2
3
4
5
6
7
8
9
10
11
12
13
14
15
16
17
18
19
20
21
22
23
24
25
@State person1 : Person = new Person ()@State person2 : Person = new Person ()@State person3 : Person = new Person ()@State person4 : Person = new Person ()@State person5 : Person = new Person ()build (Column () {Text (`person1.add: ${this .person1.age} ` )onClick ((_ ) => {AddAge .addAge (this .person1 )padding (10 ).margin (10 )Text (`person2.add:${this .person2.age} ` ).onClick ((_ ) => {new AddAge1 ().addAge (this .person2 )padding (10 ).margin (10 )Text (`person3.add:${this .person3.age} ` ).onClick ((_ ) => {this .addAge1 (this .person3 )padding (10 ).margin (10 )Text (`person4.add:${this .person4.age} ` ).onClick ((_ ) => {this .addAge ()padding (10 ).margin (10 )Text (`person5.add:${this .person5.age} ` ).onClick ((_ ) => {this .person5 .age += 2 ;padding (10 ).margin (10 )margin (10 )
会发现只有方法 4 和方法 5 才能使得UI 刷新,这是因为方法内传过去的是原生对象,修改其属性后不能触发刷新。如果我们有一些理由非得这么做,可以先赋值给一个临时变量,再将这个临时变量传入方法中,就可以刷新 UI 了。
1
2
3
4
5
6
7
8
9
10
11
12
13
14
15
16
17
18
19
20
21
22
23
24
25
26
build (Column () {Column () {Text (`person1.add: ${this .person1.age} ` )onClick ((_ ) => {let tmp = this .person1 AddAge .addAge (tmp)padding (10 ).margin (10 )Text (`person2.add:${this .person2.age} ` ).onClick ((_ ) => {let tmp = this .person2 new AddAge1 ().addAge (tmp)padding (10 ).margin (10 )Text (`person3.add:${this .person3.age} ` ).onClick ((_ ) => {let tmp = this .person3 this .addAge1 (tmp)padding (10 ).margin (10 )Text (`person4.add:${this .person4.age} ` ).onClick ((_ ) => {this .addAge ()padding (10 ).margin (10 )Text (`person5.add:${this .person5.age} ` ).onClick ((_ ) => {this .person5 .age += 2 ;padding (10 ).margin (10 )margin (10 )height ('100%' )width ('100%' )
没想到吧,哈哈哈哈哈
@Prop装饰器 和 @Link装饰器 这两个装饰器的观察能力和坑点和@State 相同,只不过是用来自定义的子组件中。
@Observed装饰器和@ObjectLink装饰器 在实际开发中,我们使用的数据模型一般都会有多层嵌套的情况,但之前介绍过的装饰器只能观察到第一层变化,无法观察到第二层变化,这种情况我们就需要使用@Observed和@ObjectLink装饰器.
使用示例 @Observed装饰class。需要放在class的定义前,使用new创建类对象。@ObjectLink变量装饰器只能装饰被@Observed装饰的class实例,必须 指定类型,并且不支持简单类型。
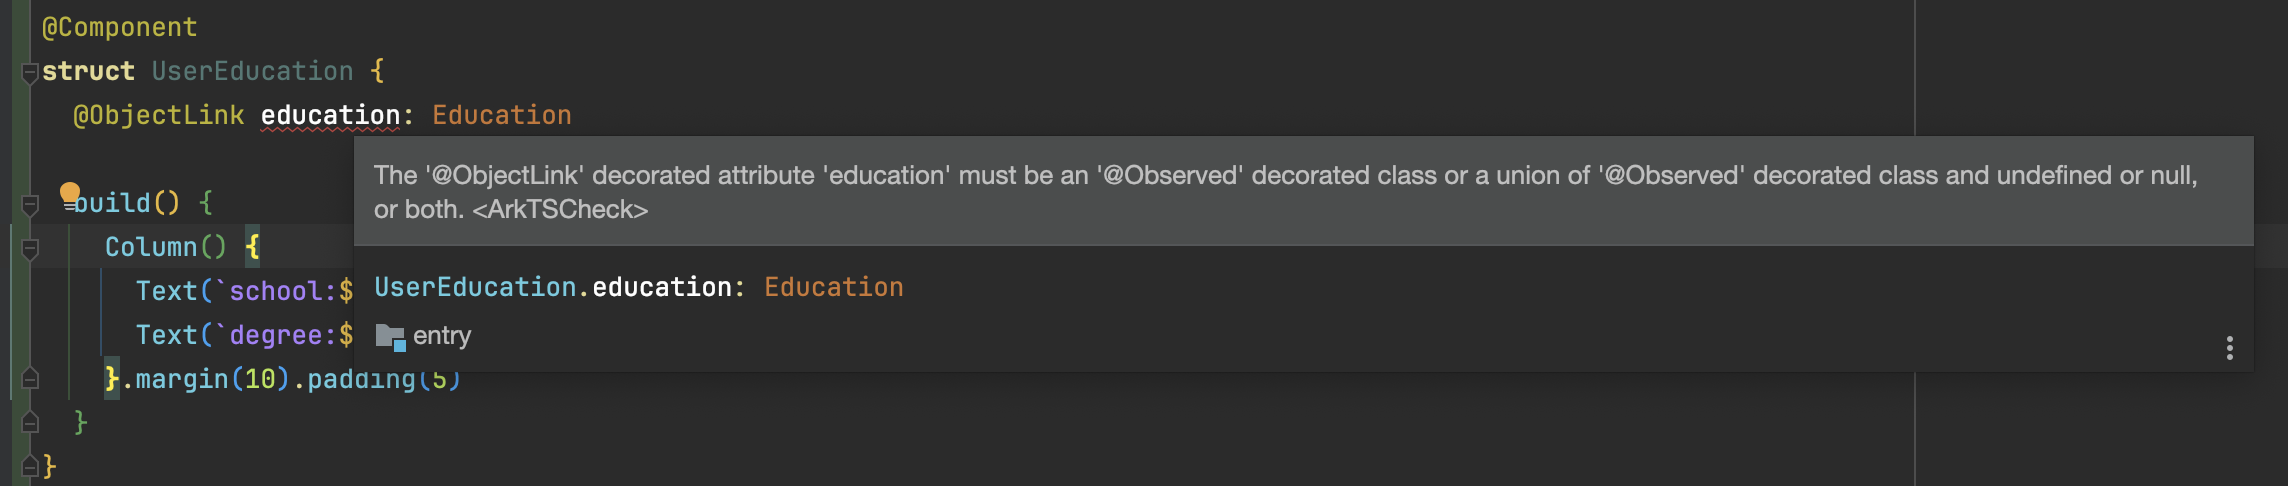
另外这两个装饰器是配套使用的,单一的使用某个装饰器无法实现观察,并且@ObjectLink只能装饰被@Observed装饰的类对象变量,否则会报错
The ‘@ObjectLink’ decorated attribute ‘education’ must be an ‘@Observed’ decorated class or a union of ‘@Observed’ decorated class and undefined or null, or both.
我们先定义一个数据类,来模拟一下业务逻辑:
1
2
3
4
5
6
7
8
9
10
11
12
13
14
15
16
17
18
19
20
21
22
23
24
25
26
27
28
29
30
31
32
33
34
35
36
@Observed class User {id : number name : string address : Address education : Education constructor (id: number , name: string , address: Address, education: Education ) {this .id = id;this .name = name;this .address = address;this .education = education;@Observed class Address {zipCode : number location : string constructor (zipCode: number , location: string ) {this .zipCode = zipCode;this .location = location;class Education {school : string degree : string constructor (school: string , degree: string ) {this .school = school;this .degree = degree;
这里还有一点需要注意的,到目前为止@ObjectLink必须在自定义组件中使用。我们这里定义两个组件,用来展示Address和Education.
1
2
3
4
5
6
7
8
9
10
11
12
13
14
15
16
17
18
19
20
21
22
23
@Component UserAddress {@ObjectLink address : Address build (Column () {Text (`location:${this .address.location} ` )Text (`zipCode:${this .address.zipCode} ` )margin (10 ).padding (5 )@Component UserEducation {@Prop education : Education build (Column () {Text (`school:${this .education.school} ` )Text (`degree:${this .education.degree} ` )margin (10 ).padding (5 )
简单的写个页面,看下效果。
1
2
3
4
5
6
7
8
9
10
11
12
13
14
15
16
17
18
19
20
21
22
23
24
25
26
27
28
29
30
31
32
33
@State user : User | undefined = undefined aboutToAppear (): void {let address : Address = new Address (10000 , "北京" )let education : Education = new Education ('university' , 'Master' )this .user = new User (1 , 'new User' , address, education) build (Column () {if (this .user ) {Text (`id:${this .user.id} , name:${this .user.name} ` )UserAddress ({ address : this .user .address })UserEducation ({ education : this .user .education })Flex ({ wrap : FlexWrap .Wrap , space : { cross : LengthMetrics .vp (5 ), main : LengthMetrics .vp (5 ) } }) {Button ('修改 name' ).onClick ((_ ) => {if (this .user ) {this .user .name += 'a' Button ('修改address.location' ).onClick ((_ ) => {if (this .user ) {this .user .address .location += 'b' Button ('修改education.degree' ).onClick ((_ ) => {if (this .user ) {this .user .education .degree += 'c'
可以看到,点击修改 name和修改address.location都可以引起 UI 刷新,但点击修改education.degreeUI不会刷新。
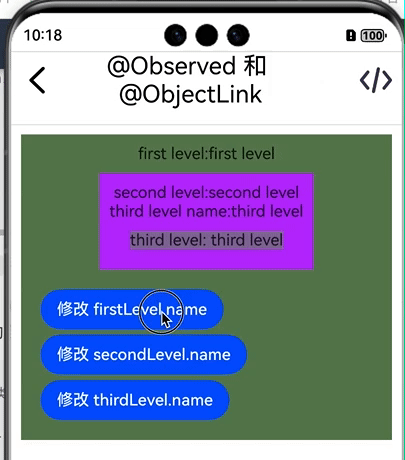
另外还有一点需要注意的:被@Observed 修饰的嵌套类,不能跨嵌套层观察。举个例子:我们有一个嵌套的三层的数据类,我们是无法在第二层的自定义控件中观察到第三层数据的变化。示例如下:
1 2 3 4 5 6 7 8 9 10 11 12 13 14 15 16 17 18 19 20 21 22 23 24 25 26 27 28 29 30 @Observed class FirstLevel {name : string secondLevel : SecondLevel constructor (name: string , secondLevel: SecondLevel ) {this .name = name;this .secondLevel = secondLevel;@Observed class SecondLevel {name : string thirdLevel : ThirdLevel constructor (name: string , thirdLevel: ThirdLevel ) {this .name = name;this .thirdLevel = thirdLevel;@Observed class ThirdLevel {name : string constructor (name: string ) {this .name = name;
然后我们定义两个用来展示SecondLevel和ThirdLevel的控件
1
2
3
4
5
6
7
8
9
10
11
12
13
14
15
16
17
18
19
@Component SecondLevelView {@ObjectLink secondLevel :SecondLevel build (Column (){Text (`second level:${this .secondLevel.name} ` )Text (`third level name:${this .secondLevel.thirdLevel.name} ` )ThirdLevelView ({thirdLevel :this .secondLevel .thirdLevel }).backgroundColor ('#846f9b' ).margin (10 )margin (10 )@Component ThirdLevelView {@ObjectLink thirdLevel :ThirdLevel build (Text (`third level: ${this .thirdLevel.name} ` )
接着写个页面试一下
1
2
3
4
5
6
7
8
9
10
11
12
13
14
15
16
17
18
19
20
21
22
23
24
25
26
27
28
29
30
31
32
33
34
@State firstLevel :FirstLevel | undefined = undefined aboutToAppear (): void {let thirdLevel :ThirdLevel = new ThirdLevel ('third level' )let secondLevel :SecondLevel = new SecondLevel ('second level' ,thirdLevel)this .firstLevel = new FirstLevel ('first level' ,secondLevel)build (Column () {if (this .firstLevel ){Column (){Text (`first level:${this .firstLevel.name} ` )SecondLevelView ({secondLevel :this .firstLevel .secondLevel }).backgroundColor ('#aa42f5' ).margin (10 )Flex ({ wrap : FlexWrap .Wrap , space : { cross : LengthMetrics .vp (5 ), main : LengthMetrics .vp (5 ) } }) {Button ('修改 firstLevel.name' ).onClick ((_ )=> {if (this .firstLevel ){this .firstLevel .name += 'a' Button ('修改 secondLevel.name' ).onClick ((_ )=> {if (this .firstLevel ){this .firstLevel .secondLevel .name += 'a' Button ('修改 thirdLevel.name' ).onClick ((_ )=> {if (this .firstLevel ){this .firstLevel .secondLevel .thirdLevel .name += 'a' margin (10 )margin (10 ).padding (10 ).backgroundColor ("#657e57" )
修改 thirdLevel.name时,只有在ThirdLevelView中的控件刷新了,在SecondLevelView中观察thirdLevel.name的 Text内容并没有刷新。这是因为在SecondLevelView中,@ObjectLink仅能观察到其代理的secondLevel:SecondLevel对象的属性变化,而secondLevel.thirdLevel.name是ThirdLevel的属性,无法观察到嵌套类的变化。
小结
不建议在被@Observed 修饰的类的构造函数中修改值,不会引起UI刷新,因为修改的是原始对象的值,并非是代理对象。
被@Observed修饰的嵌套类,不要跨嵌套层观察,建议一个数据类对应一个自定义控件。
必须使用new 创建的类对象,使用字面量对象无法被观察。比如网络请求返回的数据转成 JSON 后使用 as 强转为对应类型
通过a.b(this.object)形式调用时,修改对象中的属性后,UI 无法刷新,原因同@State
@ObjectLink的数据源更新依赖其父组件,当父组件中数据源改变引起父组件刷新时,会重新设置子组件@ObjectLink的数据源。这个过程不是在父组件数据源变化后立刻发生的,而是在父组件实际刷新时才会进行。