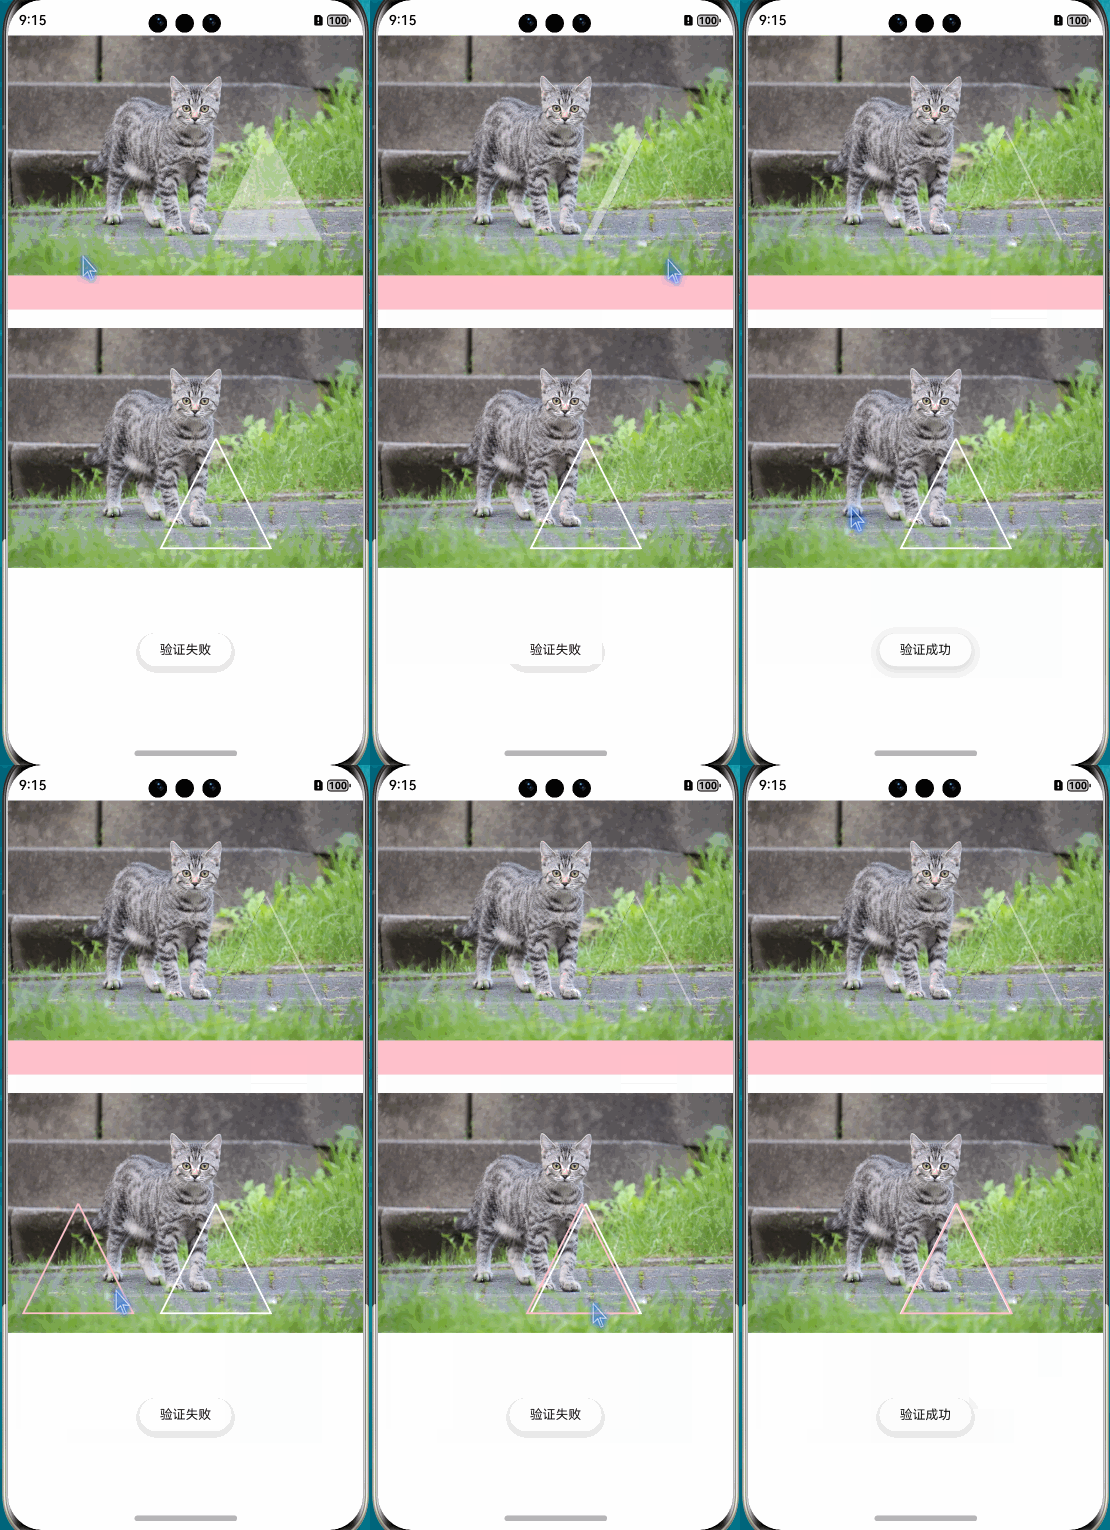
群里有朋友问图片滑块验证码怎么做,就是一张图上扣出来一块,然后拖动这一小块完成拼图。
过程 两个Canvas,一个使用drawImage画整张图片,画出来后,随机两个坐标值使用getImageData获取指定位置的图片内容。然后在这个区域绘制上边框或者填充颜色,告诉用户获取的是这个区域的内容。想上难度的话,不提示这个截取位置也行。putImageData将图片绘制出来,绑定一下移动手势监听,然后不断更新绘制图片的坐标。当抬起手指的时候,对比一下移动的坐标和抠图的坐标,在允许的范围内,判定为成功。
绘制形状方式详细解释 先看下面不需要处理抠图的,这个简单点,我们循序渐进。
定义变量 两个Canvas,需要两个CanvasRenderingContext2D分别绘制两个Canvas上的内容。
1
2
3
4
5
6
7
8
9
10
11
12
13
private settings : RenderingContextSettings = new RenderingContextSettings (true )private canvasRendering : CanvasRenderingContext2D = new CanvasRenderingContext2D (this .settings )private canvasRendering2 : CanvasRenderingContext2D = new CanvasRenderingContext2D (this .settings )private diffInterval : number = 10 private clip_start_x : number = 100 private clip_start_y : number = 100 private clip_image_width = 120 private clip_image_height = 120
布局 这个没啥好说的,Stack里面摞两个Canvas,底部的Canvas画整个图,上面的Canvas画形状。
整图Canvas 这里使用的本地图片,理论上讲,使用网络图片应该也能处理。
1
2
3
4
5
6
7
8
9
10
11
12
13
14
15
16
17
18
19
20
21
22
23
24
Canvas (this .canvasRendering ).width ("100%" ).height ("100%" ).onReady (() => {let imageBitMap : ImageBitmap = new ImageBitmap ("pages/playground/cat.webp" )this .canvasRendering .drawImage (imageBitMap, 0 , 0 )error (0x01 , 'SlideVerificationView2' , 'imageBitMap width --> ' + imageBitMap.width )error (0x01 , 'SlideVerificationView2' , 'imageBitMap height --> ' + imageBitMap.height )this .clip_start_x = Math .floor (Math .random () * (imageBitMap.width - this .clip_image_width ))this .clip_start_y = Math .floor (Math .random () * (imageBitMap.height - this .clip_image_height ))error (0x01 , 'SlideVerificationView2' , 'clip_start_x --> ' + this .clip_start_x )error (0x01 , 'SlideVerificationView2' , 'clip_start_y --> ' + this .clip_start_y )this .canvasRendering .lineWidth = 2 this .canvasRendering .strokeStyle = '#FFFFFF' this .canvasRendering .moveTo (this .clip_start_x + this .clip_image_width / 2 , this .clip_start_y )this .canvasRendering .lineTo (this .clip_start_x + this .clip_image_width , this .clip_start_y + this .clip_image_height )this .canvasRendering .lineTo (this .clip_start_x , this .clip_start_y + this .clip_image_height )this .canvasRendering .lineTo (this .clip_start_x + this .clip_image_width / 2 , this .clip_start_y )this .canvasRendering .stroke ()
需要滑动的形状 我们拿到了随机的坐标后,在新的Canvas上绘制相同的形状。priorityGesture来绑定PanGesture。注意这里滑动最小距离为5vp时识别成功 。onActionEnd的时候判断一下移动的坐标是否满足条件
1
2
3
4
5
6
7
8
9
10
11
12
13
14
15
16
17
18
19
20
21
22
23
24
25
26
27
28
29
30
31
32
33
34
Canvas (this .canvasRendering2 ).width ("100%" ).height ("100%" ).onReady (() => {priorityGesture (PanGesture ()onActionStart ((event: GestureEvent ) => {onActionUpdate ((event: GestureEvent ) => {this .canvasRendering2 .reset ()this .canvasRendering2 .moveTo (event.offsetX + this .clip_image_width /2 , this .clip_start_y )this .canvasRendering2 .lineTo (event.offsetX + this .clip_image_width , this .clip_start_y + this .clip_image_height )this .canvasRendering2 .lineTo (event.offsetX , this .clip_start_y + this .clip_image_height )this .canvasRendering2 .lineTo (event.offsetX + this .clip_image_width /2 , this .clip_start_y )this .canvasRendering2 .strokeStyle = Color .Pink this .canvasRendering2 .lineWidth = 2 this .canvasRendering2 .stroke ()onActionEnd ((event: GestureEvent ) => {error (0x01 , 'SlideVerificationView' , `onActionEnd ${event.offsetX.toString()} ` )if (Math .abs (event.offsetX - this .clip_start_x ) < this .diffInterval ) {showToast ({ message : '验证成功' })else {showToast ({ message : '验证失败' })this .canvasRendering2 .reset ()
这种是最简单的,不需要处理图片,只需要绘制形状就好了
需要处理图片的方式 比起上面这种,我们只需要多定义一个ImageData就好了
1
2
3
4
5
6
7
8
9
private settings : RenderingContextSettings = new RenderingContextSettings (true )private canvasRendering : CanvasRenderingContext2D = new CanvasRenderingContext2D (this .settings )private canvasRendering2 : CanvasRenderingContext2D = new CanvasRenderingContext2D (this .settings )private diffInterval : number = 10 private clip_start_x : number = 100 private clip_start_y : number = 100 private clip_image_width = 120 private clip_image_height = 120 private imageData?: ImageData
处理抠图 在绘制整图的Canvas上调用getImageData获取一下抠出来的图片内容就好了。
1
2
3
4
5
6
7
8
9
10
11
12
13
14
15
16
17
18
19
20
21
22
23
24
25
26
27
28
29
30
31
32
33
34
35
36
37
38
39
40
41
42
43
44
45
46
47
Canvas (this .canvasRendering ).width ("100%" ).height ("100%" ).onReady (() => {let imageBitMap : ImageBitmap = new ImageBitmap ("pages/playground/cat.webp" )this .canvasRendering .drawImage (imageBitMap, 0 , 0 )error (0x01 , 'SlideVerificationView2' , 'imageBitMap width --> ' + imageBitMap.width )error (0x01 , 'SlideVerificationView2' , 'imageBitMap height --> ' + imageBitMap.height )this .clip_start_x = Math .floor (Math .random () * (imageBitMap.width - this .clip_image_width ))this .clip_start_y = Math .floor (Math .random () * (imageBitMap.height - this .clip_image_height ))error (0x01 , 'SlideVerificationView2' , 'clip_start_x --> ' + this .clip_start_x )error (0x01 , 'SlideVerificationView2' , 'clip_start_y --> ' + this .clip_start_y )this .imageData = this .canvasRendering .getImageData (this .clip_start_x , this .clip_start_y , this .clip_image_width , this .clip_image_height )this .canvasRendering .lineWidth = 2 this .canvasRendering .fillStyle = '#66FFFFFF' this .canvasRendering .moveTo (this .clip_start_x + this .clip_image_width / 2 , this .clip_start_y )this .canvasRendering .lineTo (this .clip_start_x + this .clip_image_width , this .clip_start_y + this .clip_image_height )this .canvasRendering .lineTo (this .clip_start_x , this .clip_start_y + this .clip_image_height )this .canvasRendering .lineTo (this .clip_start_x + this .clip_image_width / 2 , this .clip_start_y )this .canvasRendering .fill ()if (this .imageData ){let width = this .imageData .width * 4 let height = this .imageData .height let rate = width / heightlet widthCenter = Math .floor (width / 2 )for (let i = 0 ; i < height; i++) {for (let j = 0 ; j < width; j++) {if (j < widthCenter - rate * i / 2 ) {this .imageData .data [i * width +j] = 0 else if (j > widthCenter + rate * i / 2 ) {this .imageData .data [i * width +j] = 0
绘制抠出来的图 这个就更简单了,相同的绑定手势方法,相同的判定方法。onActionUpdate回调中使用putImageData绘制图片
1
2
3
4
5
6
7
8
9
10
11
12
13
14
15
16
17
18
19
20
21
22
23
24
25
Canvas (this .canvasRendering2 ).width ("100%" ).height ("100%" ).onReady (() => {priorityGesture (PanGesture ()onActionStart ((event: GestureEvent ) => {onActionUpdate ((event: GestureEvent ) => {error (0x01 , 'SlideVerificationView' , event.offsetX .toString ())if (this .imageData ) {this .canvasRendering2 .reset ()this .canvasRendering2 .putImageData (this .imageData , event.offsetX , this .clip_start_y )onActionEnd ((event: GestureEvent ) => {error (0x01 , 'SlideVerificationView' , `onActionEnd ${event.offsetX.toString()} ` )if (Math .abs (event.offsetX - this .clip_start_x ) < this .diffInterval ) {showToast ({ message : '验证成功' })else {showToast ({ message : '验证失败' })this .canvasRendering2 .reset ()
到此,我们就完成了简单的滑动图片验证的功能
总结 整体的流程上面也说过了,这里就不再赘述。
